
The mixing console, often called a console or mixer, sits at the heart of any professional audio setup. It centralizes and controls various audio signals so they can be blended and shaped to the user’s needs. To choose the right mixing desk, it’s essential to understand its basic functions and components.
Essential features
- Mixing audio signals: The primary function of a mixing console is to combine multiple audio sources. These sources can include instruments, microphones, CD players, computers, and other audio devices. Mixing creates a cohesive audio signal ready to be amplified or recorded.
- Volume control: Each input channel has its own fader or knob to set the level. This allows precise adjustment of the loudness of each individual source.
- Equalization (EQ): The EQ section shapes the frequency content of audio signals to adjust lows, mids, and highs. This is crucial for sculpting tone and removing unwanted frequencies.
- Effects sends and returns (aux sends/returns): Mixers provide send circuits (Aux Sends) to route a portion of the signal to external processors like reverbs or delays, and returns (Aux Returns) to bring those processed signals back into the mix.
- Pan control: Panning places the audio signal in the stereo field, left or right. This is essential to build a balanced stereo image.
- Subgroups: Subgroups let you route multiple input channels to a single fader, making it easier to control entire sections of the mix, like a drum kit or a group of vocals.
The components of a mixing console
- Inputs and outputs :
- Mic/Line inputs: Connectors for microphones (XLR) and instruments or other audio devices (1/4" jack or RCA).
- Main outputs: Send the final mixed signal to amplifiers or PA systems.
- Monitor/Control room outputs: Used for control-room or stage monitoring.
- Channel strips :
- Preamps: Boost microphone signals to a usable level.
- EQ: Adjust the audio frequencies on each channel.
- Faders: Control the level of each channel.
- AUX sends/returns: Manage sending to and returning from external effects.
- Pan control: Place the signal within the stereo field.
- Master section :
- Main fader: Controls the overall volume of the main output.
- Level meters: Monitor output level to avoid distortion.
- Talkback: Allows communication with musicians or technicians via a built-in mic.
The different types of mixing consoles
When choosing a mixing console, it’s crucial to understand the options on the market. Mixers fall broadly into two categories: analog and digital. Each has its own strengths and trade-offs depending on the user’s specific needs.
Analog mixing consoles
Analog mixers are often preferred for their warm, natural sound. They are widely used in recording studios and live setups. Key characteristics include:
- Simplicity and ergonomics: Analog consoles are generally simpler to operate, with physical controls for each function, making quick adjustments easier during live performances.
- Sound quality: Many engineers value the rich, warm character of analog desks. They add no latency, which is crucial for live performance.
- Reliability: These consoles are known for robustness and durability. They can run for years without software updates.
- Cost: While entry models are affordable, high-end analog consoles can be expensive, especially those with many channels and advanced features.
Popular analog mixing consoles:
- Soundcraft Ghost 24: Praised for exceptional sound quality and a 4-band parametric EQ.
- Behringer Xenyx X2442 USB: Known for great value, with 24 channels and an interface compatible with DAWs.
- Tascam Model 16: Offers a USB audio interface and Bluetooth input, ideal for small live rigs and home studios.
Digital mixing consoles
Digital mixers have become very popular thanks to their advanced features and versatility. They are often used in large PA installs and modern production studios. Main advantages:
- Advanced features: Built-in effects, fader automation, and the ability to save and recall presets.
- Connectivity: Easy integration with computers and production software via USB or other digital interfaces, enabling multitrack recording and remote control.
- Compactness: Generally smaller than their analog counterparts, ideal for tight spaces.
- Flexibility: The ability to configure and reconfigure channels and effects to suit each project is a major asset.
Popular digital mixing consoles:
- Yamaha CL5: Highly valued for large live sound installs, offering up to 72 mono and 8 stereo channels.
- Allen & Heath Qu-16: Known for its intuitive touchscreen and motorized faders, ideal for production studios and live shows.
- Tascam Model 12: Integrates a multitrack recorder, audio interface, and DAW control, perfect for home studios and small stages.
Key criteria for choosing a mixing console
Selecting the right mixing console can be complex given the range of models and features. To choose well, consider several criteria that determine performance and how well the desk fits your specific requirements.
1. Number of channels
The number of available channels is one of the first things to consider:
- Small format (4 to 8 channels): Suited to simple setups—conferences, small events, or basic home studios.
- Medium format (8 to 16 channels): Fits bands in rehearsal or small gigs.
- Large format (24 channels and up): Needed for professional studios, large events, or complex projects with many sources.
2. Input types
The types and number of inputs greatly influence a mixer’s versatility:
- Mic inputs: XLR sockets with quality preamps for microphones.
- Line inputs: For instruments and audio peripherals.
- High-impedance (Hi-Z) inputs: Essential to plug guitars or basses directly without an amp.
- Stereo inputs: For keyboards and other stereo sources.
3. Connectivity and compatibility
Connectivity is crucial to integrate the mixer into an existing setup:
- USB: Lets you send mixes to a computer or monitor DAW return.
- Bluetooth: For wireless connection with mobile devices.
- MIDI: Indispensable for controlling software or other MIDI gear.
- Monitor and headphone outputs: For accurate control-room or live monitoring.
4. Effects and signal processing
Built-in processing can enhance your productions:
- EQ (equalization): Most consoles include EQ to adjust lows, mids, and highs.
- Built-in effects: Reverb, delay, chorus, etc., useful to avoid buying extra outboard.
- Inserts and AUX: To add external effects or create monitor mixes for musicians.
5. Subgroups and routing flexibility
Managing subgroups simplifies mixing multiple similar sources:
- Subgroups (sub/bus): To manage channel groups like a full drum kit or a choir section.
- Routing flexibility: The ability to route signals to different outputs or effects.
6. Portability and ruggedness
Depending on use (fixed studio or mobile events), portability and build quality can be decisive:
- Portability: Compact, lightweight desks for DJs or mobile hosts.
- Ruggedness: Solid construction to withstand touring and frequent setups.
7. Budget
Prices vary widely, so set a budget aligned with your needs and projects:
- Entry level (< €200): For beginners or small projects.
- Midrange (€200 – €1,000): For advanced amateurs and small professional installs.
- High-end (> €1,000): For professional studios and large stages.

Concrete examples by use case
Choosing the right mixer largely depends on the context in which you’ll use it. Here are five concrete examples that illustrate different requirements and suitable solutions:
1. For a conference or event hosting
For a conference or hosting, the mixer should be simple and efficient, mainly focused on managing microphones and possibly audio players for multimedia presentations.
- Recommended model: Alesis MultiMix 4
- Main features:
- 4 channels (2 mono, 1 stereo)
- XLR mic inputs with 48V phantom power
- Line input for audio players
- USB audio interface for recording and playback from a computer
- Three-band EQ on each channel
- Compact and lightweight, ideal for quick mobile setups
- Main features:
2. For a band in rehearsal
A rehearsal mixer must handle multiple instruments and vocals, offering flexible mixing options for a balanced sound.
- Recommended model: Mackie PROFX12V3
- Main features:
- 12 channels with 7 XLR inputs
- Hi-Z switches for high-impedance instruments
- Built-in multi-effects with 24 presets
- 24-bit/192 kHz 2×4 USB interface for recording and playback
- Dedicated FX return fader
- Sub 1–2 bus for subgroup management
- Ideal for a full band including bass, drums, keys, guitar, and vocals
- Main features:
3. For a home studio
A home studio needs a versatile mixer that can handle both recording and production with computer connectivity.
- Recommended model: Allen & Heath Qu-16
- Main features:
- 16 mic inputs with digitally controlled preamps
- 5-inch touchscreen for intuitive navigation
- Motorized faders for precise scene recall
- Built-in multitrack recorder via USB (18 channels at 48 kHz)
- Remote control via the Qu-Pad app on iPad
- Suited to advanced recording and mixing setups
- Main features:
4. For a project studio
A project studio requires a high-quality console with extensive connectivity and advanced processing.
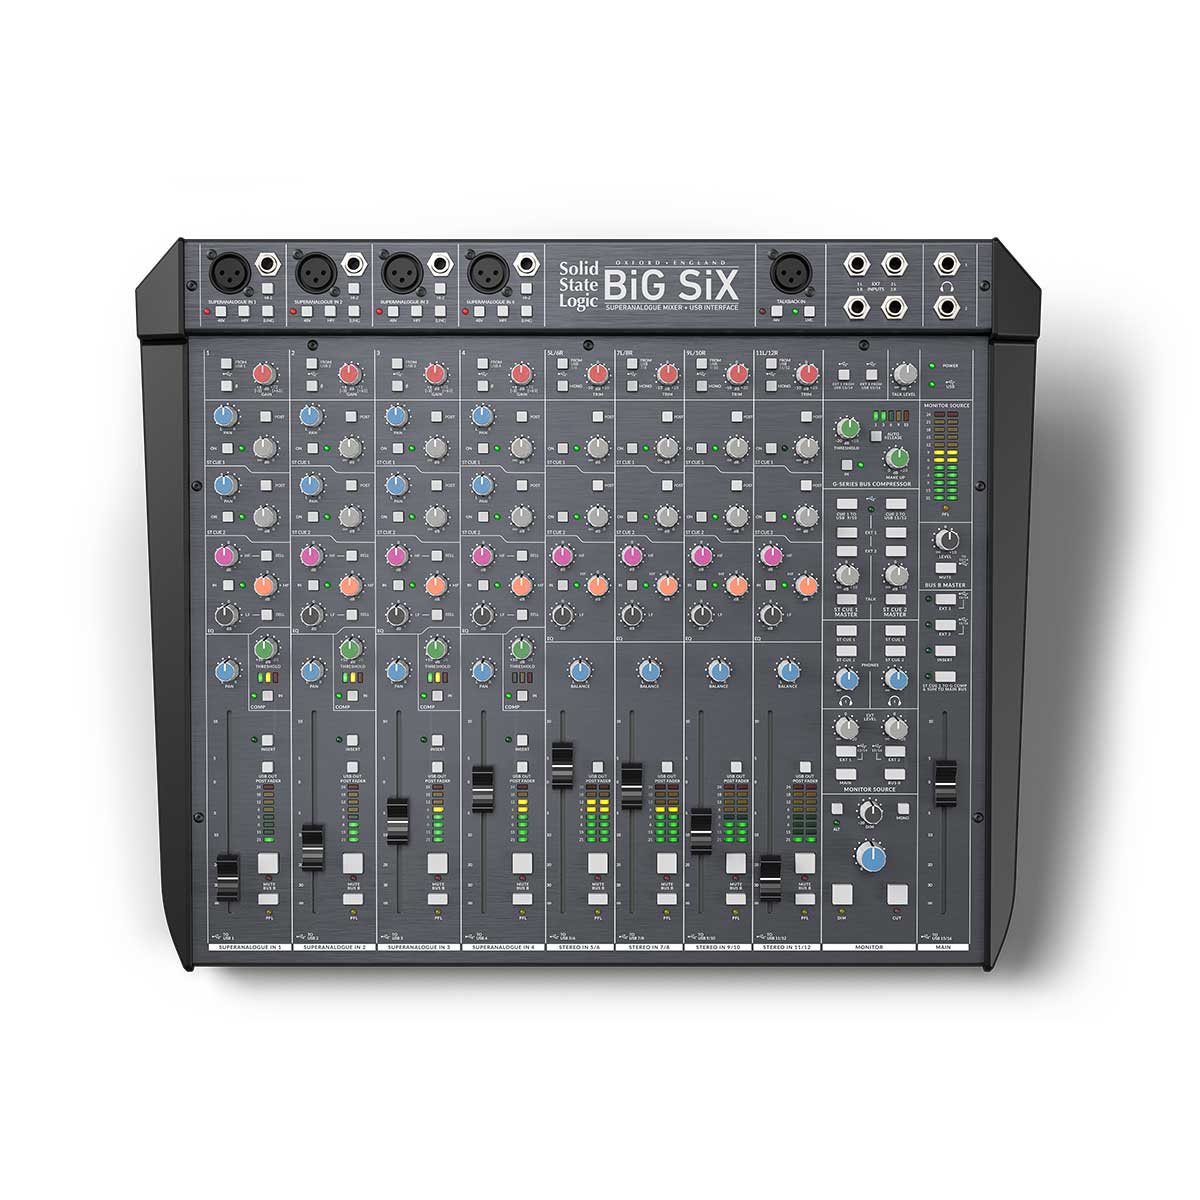
- Recommended model: SSL BiG SiX
- Main features:
- 4 mono channels with SuperAnalogue preamps
- 4 stereo channels with three-band EQ
- USB-C audio interface with 16 channels at 24-bit/96 kHz
- 100 mm faders with PFL and Mute/Bus B
- Built-in compressors on mono channels and the main bus
- Excellent for professional productions in a compact footprint
- Main features:
5. For a DJ set
DJs need a console tailored to mixing multiple audio sources, often with a crossfader for scratching.
- Recommended model: Numark M101 USB
- Main features:
- 2 channels with Phono/Line selection and USB
- Two-band EQ per channel
- Replaceable fader and crossfader
- RCA connectivity and TRS jack for mic
- USB interface for recording and audio playback
- Perfect for club or home DJ sets, enabling smooth transitions between sources
- Main features:
Hooking up and setting your mixer: practical cases
When it comes to connecting and setting a mixer, several situations can arise. Here are eight common scenarios with practical solutions for each:
1. Connecting a stage monitor to a console
For concerts and rehearsals, stage monitors are essential so musicians can hear themselves and each other. Here’s how:
- Step 1: Connect the console’s auxiliary (AUX) output to the monitor amp input or directly to an active wedge.
- Step 2: Set each channel’s level on the corresponding AUX bus.
- Step 3: Adjust the overall volume on the amp or monitor for an optimal level.
2. Plugging a microphone into a mixer
Microphones require special handling due to their low signal level. Steps to connect a mic correctly:
- Step 1: Use an XLR cable to connect the mic to an XLR input on the console.
- Step 2: Enable phantom power (48V) if you’re using a condenser mic.
- Step 3: Adjust the channel’s gain/trim to avoid clipping (clip indicator).
3. Connecting a smartphone or a computer
To integrate external sources like a smartphone or computer, follow these:
- Step 1: Use a 3.5 mm mini-jack to dual RCA adapter to connect a smartphone to the console’s Tape In.
- Step 2: For a computer, use the USB connection if your mixer has one. Otherwise, use a jack adapter.
4. Connecting a mixer to a hi-fi system
Hi-fi and pro gear use different signal levels. Here’s how to connect them:
- Step 1: Use the mixer’s Main Out outputs.
- Step 2: If needed, set the console’s output level switch (-10 dBV / +4 dBu).
5. Adding an effect to a console
Effects can be added via inserts or auxiliary (AUX) buses. Steps for both:
- Insert mode:
- Use a TRS cable to connect the effect to the channel’s Insert jack.
- Auxiliary mode:
- Connect the console’s Aux Send to the effect’s input and the effect’s output back to the console’s Aux Return.
6. Perfect mixer settings
For optimal sound, follow these tips:
- Faders: Set them at 0 dB for optimal operation.
- EQ: Adjust as needed on each channel to balance frequencies.
- Auxiliaries: Bring unused Aux sends back to 0 dB to avoid unwanted noise.
7. Setting gain on a mixer
Gain is critical for a strong, clean signal:
- Step 1: Start with the gain at zero.
- Step 2: Increase gradually until you reach a suitable level without clipping.
- Step 3: Adjust output volume with the faders.
8. Expanding a mixer’s channel count
To add more channels to an existing console:
- Step 1: Connect the Main Out of the first mixer to two Line inputs on the second.
- Step 2: Use buses or subgroups for finer control of the additional channels.
By applying these steps, you’ll ensure an optimal mixer setup for any context. For more detailed information and tutorials, you can consult online resources such as Sound on Sound and MusicRadar .
10 frequently asked questions about mixing consoles
1. What is a mixing console used for?
A mixing console, or mixer, blends multiple audio sources (mics, instruments, etc.) into a single stereo or mono signal. It’s essential for controlling and balancing sound in concerts, studio recording, or live events.
2. How is a mixing console organized?
A mixing console is usually divided into multiple channel strips. Each strip corresponds to an input and has specific controls: gain, EQ, auxes, pan, and volume (fader). Main outputs and subgroups are often on the right side of the console.
3. What’s the difference between an analog and a digital mixer?
Analog mixers use physical circuits to process sound, offering a warm sound and hands-on controls. Digital consoles use DSP for more flexibility, recallable settings, and advanced features like built-in effects.
4. Why use a USB mixing console?
A USB mixer makes it easy to transfer audio between the console and a computer. This simplifies direct recording, live streaming, and integration with DAWs.
5. How do I choose the right mixer for a home studio?
For a home studio, choose a mixer with enough inputs for current and future needs, good preamp quality, and features like USB for direct recording. Models with phantom power for condenser mics are also recommended.
6. What are the key criteria when choosing a mixer?
Key criteria include the number of inputs and outputs, preamp quality, EQ and effects features, connectivity (USB, Bluetooth), and portability. Budget and intended use (live, studio, DJing) are also decisive.
7. How do I plug a mic into a mixer?
Use an XLR cable to connect the mic to an XLR input on the mixer. If using a condenser mic, enable phantom power (48V) on that channel. Then set the gain to avoid clipping.
8. Are mixing consoles powered (amplified)?
Most mixers are not powered. Powered models mainly exist for portable PA. For studio use, consoles typically feed power amps or active monitors.
9. What’s the purpose of a monitoring circuit on a mixer?
The monitoring circuit lets you control the sound sent to stage wedges or studio headphones independently from the main output. This helps musicians and engineers hear clearly without affecting the main mix.
10. How much does a mixing console cost?
Mixer prices vary widely based on features and quality. Entry-level models start around €100, while professional consoles can cost several thousand euros. For example, an advanced digital console can reach €5,000 or more.


